
![]()
Happy September and happy first pattern post to this blog! I’ve been thinking long and hard about what types of patterns I’d like to start posting here and decided what better month than September to start? September for my is always a favorite month, not only because it’s my birthday month, but also because in our household it kicks off the official fall/Halloween season! Fall is a great time for many reasons, but one of my absolute favorite reasons are pumpkins. Pumpkin farms, pumpkin pickin’, pumpkin lattes, pumpkin treats… You get the picture! I’ve got pumpkins on my mind! And so for this blog’s first official free pattern I opted to share with you one of my favorite things to crochet during the fall season… Real stemmed crochet pumpkins! These are super easy to make and work up very quickly! You’ll need a real stem to create these, but if you’re like me you’ve already saved last year’s pumpkin stems for crafting. If not, you’d be surprised at how many people you may know who already have some! Just ask around! So without further ado…
Materials
- 7.00mm crochet hook
- Super Bulky Yarn (I used Lion Brand Hometown USA in color Portsmouth Pumpkin)
- Worsted weight yarn in green color
- Dried real pumpkin stem
- Polyfill Stuffing
- Hot glue gun
- Embroidery Needle
To begin this crochet pumpkin you will need to have your pumpkin stem on hand. If not already, make sure that the pumpkin stem is cleaned and dried. Depending on the size of the base of your pumpkin stem the beginning portion may differ. I will begin the steps until a common number of sc can be achieved using multiples of 6 for stitch count (for example 12 stitches, 18 stitches, 24 stitches etc). Let’s start off step by step!
Step 1: With your pumpkin stem in one hand and your yarn in the other begin to chain enough chain stitches around to fit the base of your pumpkin stem as follows:
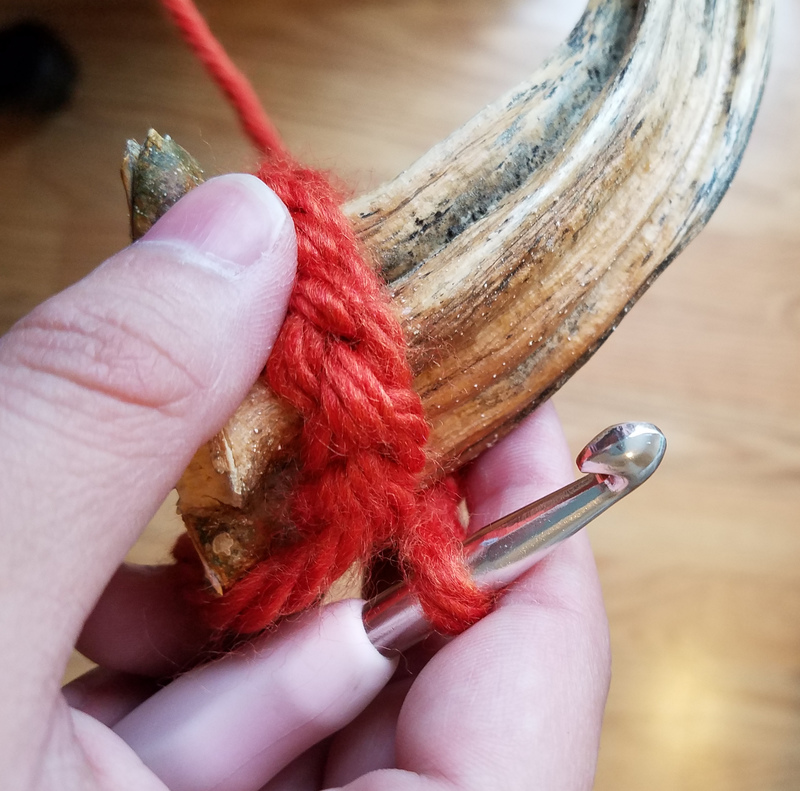
I was able to achieve 12 ch st around the base of the stem. Your stem may differ in the amount you are able to chain. That’s okay! Sl st your beginning ch to your final ch to secure a tight loop around the stem.
Step 2: Continue to hold your ch stitches in place around the stem. You will now begin to sc a round around the piece.
Step 3: Still working around the pumpkin stem increase the number of stitches equally until you reach 24 sc around. This may take another round or two depending on the size of your stem base.
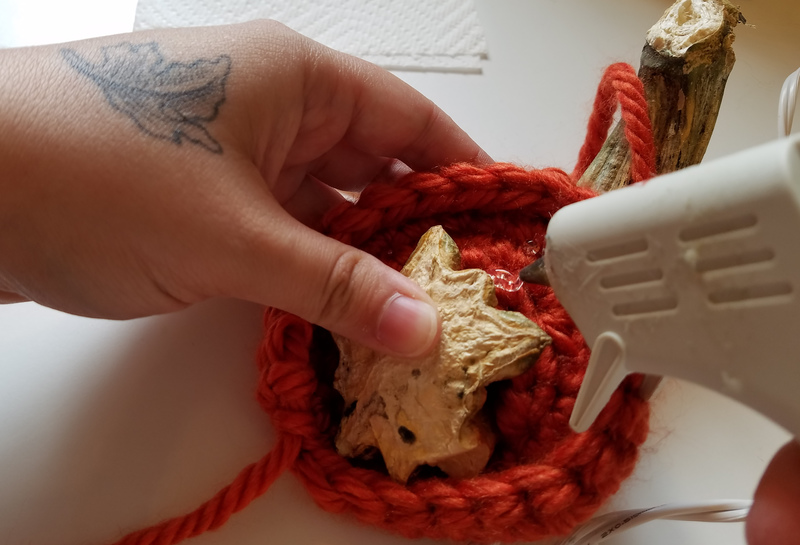
Step 4: You should now have the top portion of the pumpkin began and covering a majority (if not all) of your stem. If it is not covered, sc another round of 24 sts. Once the base of the stem is completely covered by yarn you will take your hot glue gun and glue the stem in place to the yarn. Be sure to use as much glue as needed to keep the stem snug and upright.
Now continue to work in increasing rounds to form the remainder of the pumpkin working off of the 24 sc around.
Round 1: *sc in 1st 3 sts, inc in the next st*; repeat around (30)
Round 2: *sc in 1st 4 sts, inc in the next st*; repeat around (36)
Round 3: *sc in 1st 5 sts, inc in the next st*; repeat around (42)
Round 4: *sc in 1st 6 sts, inc in the next st*; repeat around (48)
Rounds 5-8: sc in each st around (48)
Round 9: *sc in 1st 6 sts, dec in the next 2 sts*; repeat around (42)
Round 10: *sc in 1st 5 sts, dec in the next 2 sts*; repeat around (36)
Round 11: *sc in 1st 4 sts, dec in the next 2 sts*; repeat around (30)
Round 12: *sc in 1st 3 sts, dec in the next 2 sts*; repeat around (24)
Round 13: *sc in 1st 2 sts, dec in the next 2 sts*; repeat around (18)
Fill the pumpkin with polyfill stuffing here.
Round 14: *sc in 1st st, dec in the next 2 sts*; repeat around (12)
Round 15: dec around until piece closes. Fasten off, but do not cut your remaining strand of yarn. Leave an extra long tail (Mine measured around 36 inches) to use for making the pumpkin ribs.
Now you will take the pumpkin and begin to create the ribs using the long yarn tail at the bottom of piece. You create the ribs by taking the yarn tail upward towards the stem with your embroidery needle and feeding it down into the pumpkin to the bottom where you start. Pull through tightly to squeeze each rib into shape.. You should be able to create about 5 or 6 ribs total to give it a pumpkin appearance. Fasten off and weave in all ends.
![]()
Now you have a lovely real stemmed crochet pumpkin perfect for all of your fall decorating needs! The beauty part about this pumpkin pattern is that it can be applied to various yarn types and weights and different hook sizes. Don’t like super bulky yarn as used in this pattern? Go ahead and grab some worsted weight and a smaller hook! Just follow the base instructions of the pattern and you will be able to achieve pumpkin making! If you want your pumpkin taller just add a few more rounds to it. If you want it smaller, decrease the amount of increases in the pumpkin! Over the years I’ve made various sizes of these real stem pumpkins with yarns from acrylic to alpaca and cotton. They’re beautiful to put around the house and always receive compliments from guests. And if you’d like to add a little flare go ahead and add some ribbon or a twine bow around the stem! You can even add vines to it by following the simple step below:
Basic Vine:
Ch 25 (increase or decrease depending on the length you’d like to achieve).
Starting from 2nd ch from hook work your way down the ch piece by placing 3sc in each ch space.
The piece will begin to curl and resemble vines. Sl st and fasten off leaving a long tail for sewing.
![]()
Your possibilities are endless! Have fun!
All designs & pictures are copyrighted by To Craft A Home 2017. Pattern is for personal use only and can’t be resold, republished, or redistributed in any way. You may sell the finished project if you so desire, but please give credit and link to my website http://tocraftahome.com and https://www.etsy.com/shop/ToCraftAHome.