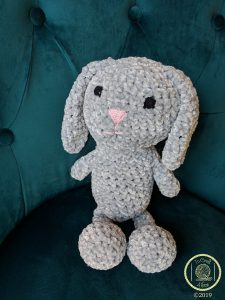
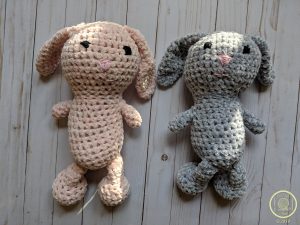
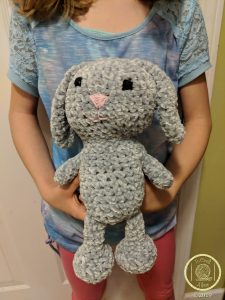
It’s been awhile since I posted and I do apologize! Since the beginning of the year my house has been in a constant state of chaos in preparation for moving. This includes all sorts of fun home repair projects, packing up house, realtor visits, the works! I was also presented with an amazing opportunity that I’ll expand upon next post with a specifically inspired project! So stay tuned… Still though, with Easter around the corner, I did find time to make up this adorable velvet rabbit pattern and I wanted to share it with all of you!
I had in the past made up a bunny pattern from the thicker blanket yarn, but since seeing velvet yarns all around craft stores, I couldn’t resist the opportunity to make up a new pattern featuring this perfect yarn. Thoughts of the old childhood story Velveteen Rabbit came to mind while making her up and of course I just had to share it!

She’s quite simple to make up, but takes a bit more time to work up than my Velvet The Super Soft Bunny Rabbit featuring the thicker blanket yarn, so if you’re in a hurry I suggest that pattern instead! If you have a day or two to complete this sweet bunny, however, this pattern will be great for you!

Materials:
-6.5mm crochet hook
-Bernat Velvet Yarn in any preferred color
-Small amounts of cotton yarn for embroidering face or safety eyes if you choose
-Embroidery needle
-Polyfill stuffing
Head
6sc in magic circle.
Round 1: 2sc in each st around (12)
Round 2: *sc in 1st st, inc in next st*; repeat around (18)
Round 3: *sc in 1st 2 sts, inc in next st*; repeat around (24)
Round 4: *sc in 1st 3 sts, inc in next st*; repeat around (30)
Round 5: *sc in 1st 4 sts, inc in next st*; repeat around (36)
Rounds 6-11: sc in each st around (36)
Round 12: *sc in 1st 4 sts, dec in next 2 sts*; repeat around (30)
Round 13: *sc in 1st 3 sts, dec in next 2 sts*; repeat around (24)
At this point I recommend sewing on face details or inserting safety eyes if you choose to use those.
Round 14: *sc in 1st 2 sts, dec in next 2 sts*; repeat around (18) This will begin to work the neck portion of the rabbit.
Round 15: sc in each st around (18)
Now you will begin to form the body. Begin to stuff the piece while you work it.
Round 16: *sc in 1st 2 sts, inc in next st*; repeat around (24)
Rounds 17-25: sc in each st around (24)
Round 26: *sc in 1st 2 sts, dec in next 2 sts*; repeat around (18)
Round 27: *sc in 1st st, dec in next 2 sts*; repeat around (12)
Round 28: dec around (6)
Round 29: dec until body closes.
Fasten off and sew in ends.
Ears (make two)
4sc in magic circle.
Round 1: 2sc in each st around (8)
Round 2: sc in each st around (8)
Round 3: *sc in 1st st, inc in next st*; repeat around (12)
Rounds 4-8: sc in each st around (12)
Round 9: *sc in 1st, dec in next 2 sts*; repeat around (8)
Rounds 9-16: sc in each st around (8)
Fasten off leaving a long strand for sewing. Do not stuff the ears. After both ears have been completed, sew them on top of the rabbit head.
Arms (make two)
6sc in magic circle.
Rounds 1-6: sc in each st around (6)
Fasten off leaving a long strand for sewing. Stuff the arm lightly.
Legs (make two)
6sc in magic circle.
Round 1: 2sc in each st around (12)
Round 2: *sc in 1st st, inc in next st*; repeat around (18)
Rounds 3-4: sc in each st around (18)
Round 5: *sc in 1st st, dec in next 2 sts*; repeat around (12)
At this point you will want to firmly stuff the foot.
Round 6: *sc in 1st st, dec in next 2 sts*; repeat around (8)
Rounds 7-12: sc in each st around (8) Fasten off. You may choose to lightly stuff the leg, but I left it unstuffed so that it would be floppier.
Tail
6sc in magic circle
Round 1: 2sc in each st around (12)
Rounds 2-3: sc in each st around (12)
Fasten off leaving a long strand for sewing. Lightly stuff the tail.

After you have crocheted each individual piece just sew them all together and enjoy your finished rabbit! These will make excellent Easter gifts or just because.
Happy Easter!!!
All designs & pictures are copyrighted by To Craft A Home 2019. Pattern is for personal use only and can’t be resold, republished, or redistributed in any way. You may sell the finished project if you so desire, but please give credit and link to my website or my Etsy
Find more of my patterns on Ravelry
https://www.tocraftahome.com

Thank you so much for the patterns!
You’re very welcome! Enjoy!!!