
Is there anything better than crocheting a gift for a soon to be born baby? One of my very good friends is due to have her very first child this September and I couldn’t wait to get my hands on some new crochet projects for the occasion! Of course I bookmarked dozens of cute baby patterns I found online and I scoured my crochet books repeatedly for the exact right idea. Nothing felt right though. I really wanted to make her baby something special with a nice classic feel. I thought of my own two children and those early baby years, drawing on experience to bring back memories of what their little hands and hearts cherished in those days. Then it hit me. A security blanket! My oldest daughter could not leave the house without her beloved pink crochet blanket. For years and years we traveled with this mangled, falling apart, shredded crocheted blanket. God forbid we forget it! Tears fell like waterfalls from her eyes in those instances. A great amount of comfort came upon her every time she snuggled or wrapped herself up in the blanket. Instant soothing. It always warmed my heart to see how much joy that blanket gave to her, but sadly because of how large it was and all the years of extra love, it eventually succumbed to its wounds and could not be saved. I remember thinking then that I wished her baby blanket would have been smaller and more easily transportable. It would have avoided us a great amount of sadness. These days, of course, she is just fine and the days of longing for her beloved pink blanket are far gone and out of the mind of a big 10 year old, but the sentimental side of me really would have loved to have been able to keep that blanket for her.
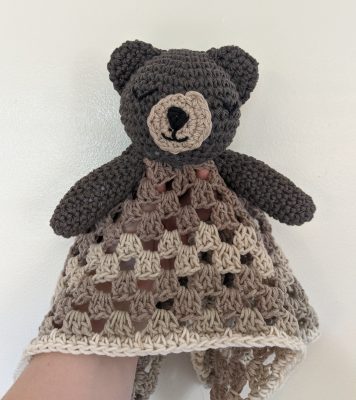
And so I opted to design a security blanket pattern to make up a gift for my friend. I designed the blanket portion of this pattern off of the exact cluster stitch that my daughter’s blanket used to have (again, the sentimental side of me is showing), and off of a classic teddy bear for easy cuddles and gripping. With cotton yarn, you can’t go wrong, and with the finished size of this piece, it’ll be sure to have many years of love ahead of it! Little hands are going to love this one!
Materials
-5.5mm and 3.5mm crochet hooks
-Medium weight yarn in cotton (I used Caron Cotton Cake brand in self striping Almond Crisp color)
-Medium weight cotton yarn in tan and brown and a small amount of black for embroidering facial features
-Embroidery Needle
-Polyfil stuffing
Stitches to Know
DC: double crochet
Ch: chain
HDC: half double crochet
Sl St: Slip stitch
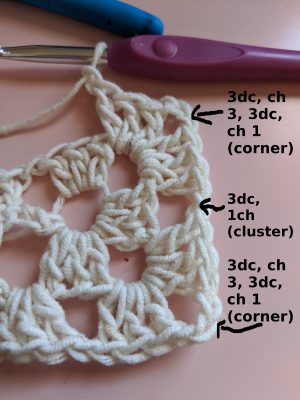
Cluster : 3dc, ch 1
Corner cluster: 3dc, ch 3, 3dc, ch 1 (see instructions for first formed corner cluster as it works up slightly differently)
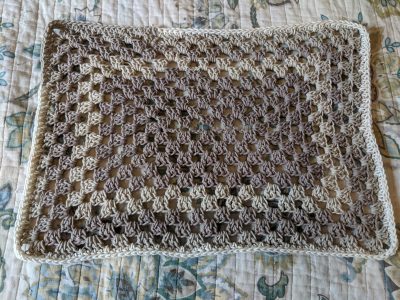
The great thing about this security blanket pattern is that it’s not limited to just a small security blanket for babies. I personally have followed this pattern for lap blankets and even a twin sized blanket for my daughter. I only suggest that you add additional chains to your original chain count if you decide to do a blanket and keep it in four count (for example, you might want to start off a larger blanket pattern with 36 chains). Just follow the basic instructions below and you’ll be well on your way and may even opt to make a matching baby blanket to go with this security blanket!
Security Blanket
Use 5.5mm crochet hook
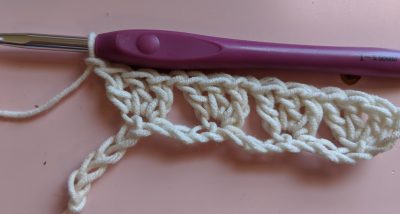
Step 1: Ch 20. In 4th ch from hook place 2dc and a ch 1. The three skipped chains will count as one dc making your first cluster of 3dc in the first ch st. You will then continue to work your way down the ch by forming more clusters. To do so skip the next 3 ch spaces and form your 3dc cluster into the 4th ch space followed with a ch 1. Repeat this step (*skip 3 ch spaces, 3dc, ch 1*) until you reach the last 4 ch spaces. At this point you should have 4 total 3dc, ch 1 clusters.
Step 2: You will now begin making your first corner. As with the previous cluster formations you will skip the next 3 ch spaces and crochet directly into the last ch space. You will place 3dc in your last ch space and now ch 3 and place an additional 3dc into the same ch space. Ch 3 again and place one last addition 3dc into the same ch space. Ch 1. You have completed your first corner. It will look like this:

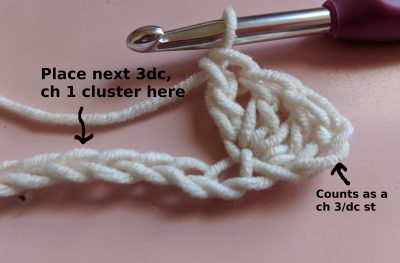
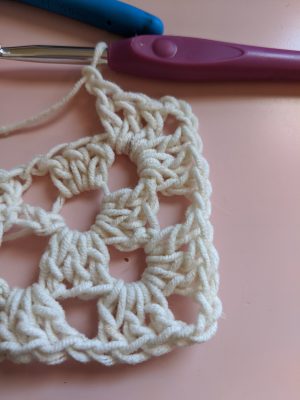
Step 3: As you complete your first corner you will begin to crochet on the other side of the original chain. You will put a cluster of 3dc into the bottom ch space of the opposite side’s 3dc cluster. Here is an example photo of where to place each cluster:
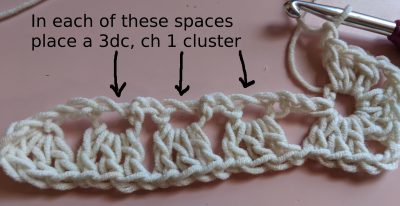
Continue to now place 3dc and ch 1 into the bottom of each original cluster from the opposite side until you reach the corner.
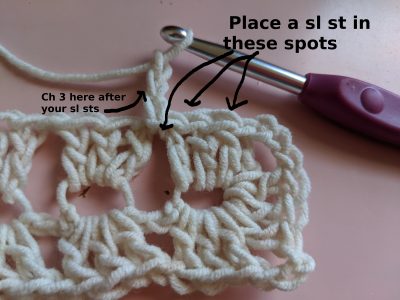
Step 4: For the final corner you will be meeting where you started and therefore will have part of the corner already complete. To finish it place 3dc, ch 3, 3 dc, and ch 3 and slip stitching into the top of the original ch 3 of this piece. It will look like this:
From this point you will place a sl st in each of the 2 dc sts and into the next ch 1 space. Ch 3. This will start your new row.
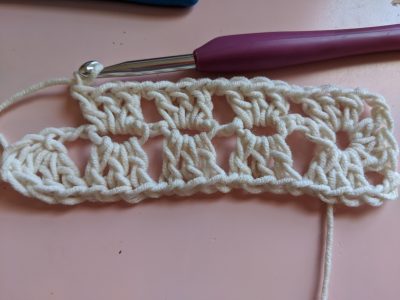
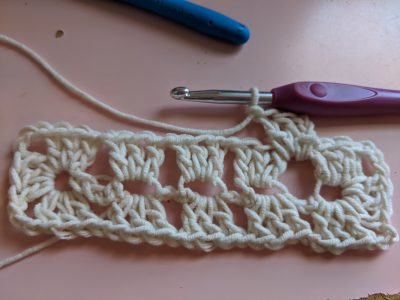
Following the ch 3 place 2dc in the same ch 1 space to form your first cluster on the next row. Ch 1. It will look as follows:
Step 5: You will now continue to work around. At this point the blanket will work up quite easily as you will be working directly into each ch 1 space. Place 3dc in each ch 1 space followed with a ch 1 to form your clusters.
Step 6: Now as you reach your corners you will place 3dc, ch 3, 3dc, ch 1 in each corner space.
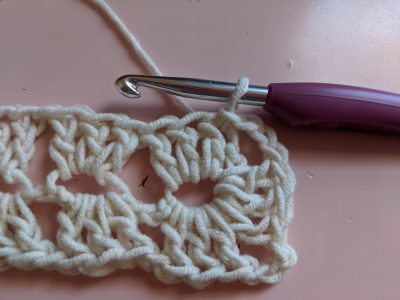
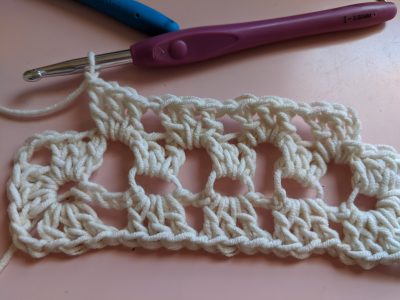
You will then continue to work clusters (3dc, ch 1) into each ch 1 space keeping in mind to place (3dc, ch 3, 3dc, ch 1) in each corner as you turn. After this next blanket round you will begin to have cluster spaces in between your corners. Work those normally (3dc, ch 1) as you would across your blanket. Direct corner spaces will be the only places you will need to add your (3dc, ch 3, 3dc, ch 1) cluster. Here’s an illustrated guide to demonstrate:
Continue to work your clusters and corner clusters until you have reached the desired length for your security blanket. After your length is reached, make a border of 1 hdc st in each dc sts placing 1 hdc in each ch space around. Place 3hdc in the corner spaces.
This little security blanket project is great for scrap yarn. I had leftover yarn from a baby blanket I was working on, so I stopped when my piece measured 13in x 17.5in (about 9 or 10 rounds in total) but you may choose to make yours a little bigger.
And really that’s it! It’s such a simple blanket. Very easy to make up while conversing with friends or watching a good movie! And it works up super fast! Perfect for those last minute shower gifts.
Now onto the finishing touches for this lovey.
Bear Head
Use 3.5mm crochet hook and brown cotton yarn
6sc in a magic circle
Round 1: inc in each st around (12)
Round 2: *sc in 1st st, inc in the next*; repeat around (18)
Round 3: *sc in 1st 2 sts, inc in the next st; repeat around (24)
Round 4: *sc in 1st 3 sts, inc in the next st; repeat around (30)
Round 5: *sc in 1st 4 sts, inc in the next st*; repeat around (36)
Rounds 6-12: sc in each st around (36)
Round 13: *sc in 1st 4 sts, dec next 2 sts together*; repeat around (30)
Round 14: *sc in 1st 3 sts, dec next 2 sts together*; repeat around (24)
Round 15: *sc in 1st 2 sts, dec next 2 sts together*; repeat around (18)
Round 16: sc in 1st st, dec next 2 sts together*; repeat around (12)
Stuff with polyfil stuffing.
Round 17: Continue to dec until piece closes. Leave a long tail for sewing later.
Ears (Make two)
Use 3.5mm crochet hook and brown yarn
6sc in a magic circle
Round 1: inc in each st around (12)
Rounds 2-4: sc in each st around (12)
Fasten off leaving a long tail for sewing. Sew ears on top of the head equally spaced apart.
Muzzle
Use 3.5mm crochet hook and tan yarn
6sc in a magic circle
Round 1: inc in each st around (12)
Round 2: *sc in 1st st, inc in the next*; repeat around (18)
Fasten off leaving a long tail for sewing.
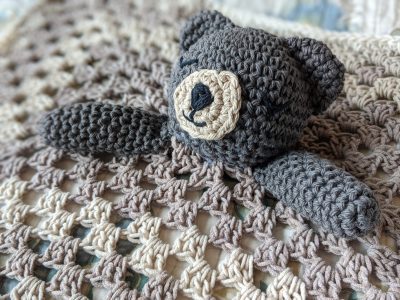
At this point I began to put the head together. I found that it helped to embroider a nose and mouth onto the muzzle first and then find a proper centered placement of it on the bear head. Having the ears placed first helps with alignment. Next embroider eyes just above the muzzle. I chose to make a sleepy bear face, but it’s entirely up to you!

Arms (Make two)
Use 3.5mm crochet hook and brown yarn
5 sc in a magic circle
Round 1: inc in each st around (10)
Rounds 2-15: sc in each st around (10)
Fasten off leaving a long tail for sewing. Lightly stuff the arm.
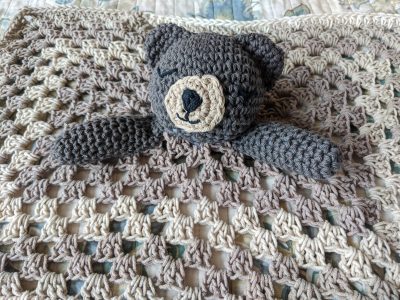
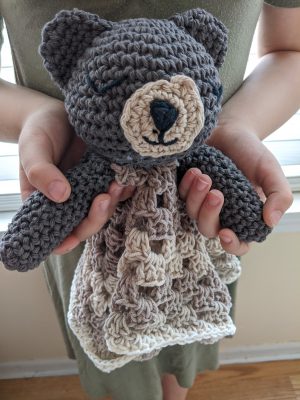
Now all that is left is assembly! The easiest way I found to attach the bear and arms to the security blanket was to find the original middle chain stitch (assuming yours measures the same size as mine. If not, you’ll have to establish center by eyeballing it or counting cluster stitches from top to bottom/side to side). Once you find the center of the blanket, sew the arms a few cluster stitches apart (I sewed them 4-5 apart) and then sew the head between them as follows:

That’s it! Your security blanket is finished! These make fantastic gifts for baby showers or that one toddler in your life that really loves his or her blanket. Best thing yet, it’s a fairly quick project to work up and sure to find a special place in the heart of a child. Happy crocheting!
All designs & pictures are copyrighted by To Craft A Home 2020. Pattern is for personal use only and can’t be resold, republished, or redistributed in any way. You may sell the finished project if you so desire, but please give credit and link to my website or my Etsy
Find more of my patterns on Ravelry