
Ah… Summer. A time of sunshine, swimming, relaxation, and vacation. It was my absolute favorite time as a kid and as I watch my kids grow I can see it’s a time that they look forward to each year as well. One thing that always stands out about summer are those extra hot days. The 90+ degree days. The eternal heatwave stretch of summer. I’ve found that the best solution for those days is the classic ice pop. Not just any popsicle, but the ice pop aka freeze pop aka otter pop style. I can still recall those moments of coming into the house after a long day of running and playing in my grandpa’s backyard feeling as though I’d never cool down. Not even the coldest a/c could put a dent in summertime overheating! But always my grandpa would find the solution with that glorious ice pop and within seconds I’d feel better than ever. There’s just something about overly sugary flavored ice. It just hits the spot (especially the red and green ones, my favorite!).
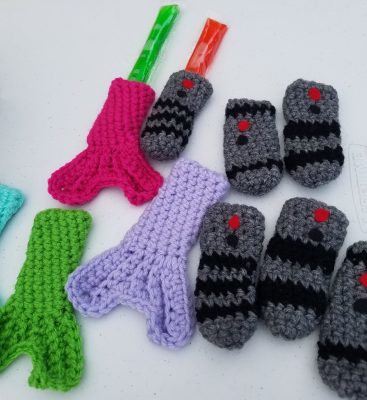
As I mentioned in the previous posts, I’ve recently gone through a move. Currently I’m setting up my office and trying to get my work space in order and throughout all of my organizing I’ve come across many old photos and patterns. I happened upon a couple of ice pop holder patterns from when my kids were a lot smaller and it just warmed my heart looking back at the photos. Back in the days when their little hands became too cold holding their ice pops. They loved them so much, but it always sent such a chill to their tiny little bodies! I knew then I needed to come up with a solution for them to have a better, more comfortable grip of the popsicles because I wanted them to be able to enjoy them as much as I did when I was little! My solution was a popsicle holder. Of course, my girls being entirely opposite of one another, I had to make them in a way to appeal to each child. My oldest was huge into Star Wars at the time so I treated her to a lightsaber holder style. My youngest was into everything princess and mermaids so we settled on a mermaid fin style. It was great fun coming up with the designs and they were well loved that whole entire summer! So loved, in fact, that I ended up selling more of them at my local farmers market for all the other kids in town to enjoy as well. They were a hit!
And so, let me share with you, my two ice pop holder patterns.
Materials:
-5.00mm crochet hook
-Worsted weight yarn in colors gray and black (for lightsaber), and color of your choice (for mermaid)
-Embroidery Needle
-Red and black felt pieces (cut in small circles for buttons for lightsaber pattern)
-Hot glue or thread to attach felt buttons (for lightsaber)
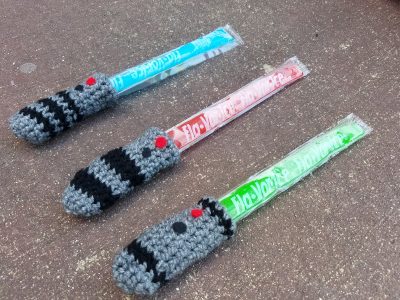
Lightsaber Holder
Start with gray yarn
6 sc in magic circle
Round 1: inc in each st around (12)
Round 2: sc in each st around (12)
Change to black yarn
Round 3: sc in each st around (12)
Change to gray yarn
Round 4: sc in each st around (12)
Change to black yarn
Round 5: sc in each st around (12)
Change to gray yarn
Round 6: sc in each st around (12)
Change to black yarn
Round 7: sc in each st around (12)
Change to gray yarn
Rounds 8-13: sc in each st around (12)
Fasten off and weave in ends.
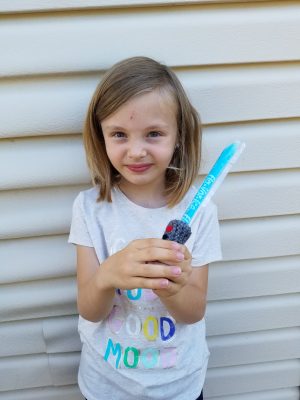
At this point you will want to take your little felt button pieces and hot glue them to the top right below the opening, as pictured above. The pattern I included is for the light blue ice pop holder. You may opt to make yours slightly different with the striping as I did in the other two versions too! It’s just about alternating colors. This is especially helpful if you have more than one little Star Wars fan in your household.
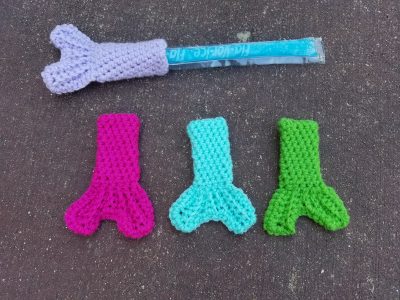
Mermaid Holder
Use your desired color
Ch 12. Attach to form ring.
Round 1: sc in each st around (12)
Rounds 2-13: sc in each st around (12)
To form tail you will lay piece flat. Put hook through both sts to close up bottom of piece. Do not fasten off.
Longer Fin portion: Ch 7 from where you left off. Sc in 2nd ch from hook and and all the way down for a total of 6sc. Sl st into the bottom of the piece. Go back up the piece in BLO sc for six total stitches. Continuing in BLO, sc all the way back down for another 6 sc. Sl st into the bottom of the piece. This will create and shape the ribbing of the first portion of the fin.
Middle Fin portion: You will now begin the middle part of the fin. Sc in BLO up 3 sts. In BLO follow the piece down for another 3 sc placing a sl st at the bottom. Go up for another 3 sc in BLO and then ch 4. You will now start the last part of the fin.
Longer Fin Portion: Repeat the original longer tail fin instructions until you reach the end and sl st into the final bottom row sts.
Sc a border around tail fins to finish the piece. Fasten off and weave in ends.
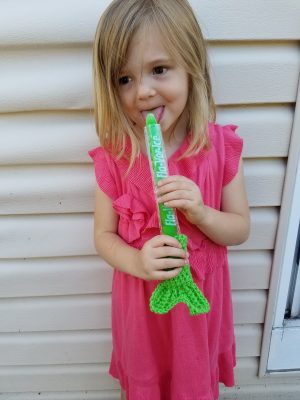
Maybe your kiddo will spend their summer in the pool with their mermaid ice pop in hand, or perhaps they’ll have lightsaber battles with their cool treat! Regardless of which pattern you choose to create, one thing is for certain. This summer will be that much cooler (ha! See what I did there?) with these fun holders. Enjoy the remainder of these hot days and happy crocheting!
All designs & pictures are copyrighted by To Craft A Home 2020. Pattern is for personal use only and can’t be resold, republished, or redistributed in any way. You may sell the finished project if you so desire, but please give credit and link to my website or my Etsy
Find more of my patterns on Ravelry