
![]()
My friend recently had a baby and as any good crocheter friend will do, I opted to make her little guy a hat for the cooler days that have now arrived. I found Lion Brand’s Touch of Alpaca and just knew I needed to make a fun pom pom hat. This yarn is so soft and perfect for tiny heads! If you can’t find it though, any worsted weight yarn will do.
Materials:
-Worsted weight yarn in any color of your choosing (I used Lion Brand Touch of Alpaca in Taupe)
-Size 5.5mm (I) crochet hook
-Tapestry needle
-medium sized pom pom maker
0-3 Month
Round 1: 8 Hdc in a magic circle, join. (8)
Round 2: Chain 2 (from this point forward count ch 2 as one stitch), hdc in same stitch, 2 hdc in next stitch and in each stitch around and join with a sl st at the top of ch 2 (16)
Round 3: Chain 2, hdc in same stitch, hdc in next stitch, * 2 hdc in next stitch, hdc in next stitch * repeat around and join with a sl st at the top of ch 2 (24)
Round 4: Chain 2, hdc in same stitch, hdc in next 2 stitches, * 2 hdc in next stitch, hdc in next 2 stitches * repeat around and join with a sl st at the top of ch 2. (32)
Round 5: Chain 2, hdc in same stitch, hdc in next 3 stitches, * 2 hdc in next stitch, hdc in next 3 stitches * repeat around and join with a sl st at the top of ch 2. (40)
Rounds 6-9: Chain 2, hdc all around, join. (40)
***Now scroll down for the ribbing instructions to continue on from here (all hat sizes will use the same instructions for ribbing).
Final round: After finishing your ribbing you should end on the outer edge of the hat. If not, attach your yarn to the outer edge to make your final round. You will now make a border of sc around the outer edge of the house (40). Fasten off and weave in ends.
3-6 Month
Round 1: 8 Hdc in a magic circle, join. (8)
Round 2: Chain 2 (from this point forward count ch 2 as one stitch), hdc in same stitch, 2 hdc in next stitch and in each stitch around and join with a sl st at the top of ch 2 (16)
Round 3: Chain 2, hdc in same stitch, hdc in next stitch, * 2 hdc in next stitch, hdc in next stitch * repeat around and join with a sl st at the top of ch 2 (24)
Round 4: Chain 2, hdc in same stitch, hdc in next 2 stitches, * 2 hdc in next stitch, hdc in next 2 stitches * repeat around and join with a sl st at the top of ch 2. (32)
Round 5: Chain 2, hdc in same stitch, hdc in next 3 stitches, *2 hdc in next stitch, hdc in next 3 stitches * repeat around and join with a sl st at the top of ch 2. (40)
Round 6: Chain 2, hdc in same stitch, hdc in next 7 stitches, * 2 hdc in next stitch, hdc in next 7 sts * repeat around and join with a sl st at the top of ch 2. (45)
Rounds 7-10: Chain 2, hdc all around, join (45) Fasten off.
***Now scroll down for the ribbing instructions to continue on from here (all hat sizes will use the same instructions for ribbing).
Final round: After finishing your ribbing you should end on the outer edge of the hat. If not, attach your yarn to the outer edge to make your final round. You will now make a border of sc around the outer edge of the house (45). Fasten off and weave in ends.
6-12 Month
Round 1: 8 Hdc in a magic circle, join. (8)
Round 2: Chain 2 (from this point forward count ch 2 as one stitch), hdc in same stitch, 2 hdc in next stitch and in each stitch around and join with a sl st at the top of ch 2 (16)
Round 3: Chain 2, hdc in same stitch, hdc in next stitch, * 2 hdc in next stitch, hdc in next stitch * repeat around and join with a sl st at the top of ch 2 (24)
Round 4: Chain 2, hdc in same stitch, hdc in next 2 stitches, * 2 hdc in next stitch, hdc in next 2 stitches * repeat around and join with a sl st at the top of ch 2. (32)
Round 5: Chain 2, hdc in same stitch, hdc in next 3 stitches, * 2 hdc in next stitch, hdc in next 3 stitches * repeat around and join with a sl st at the top of ch 2. (40)
Round 6: Chain 2, hdc in same stitch, hdc in next 4 stitches, * 2 hdc in next stitch, hdc in next 4 stitches * repeat around and join with a sl st at the top of chain 2 (48)
Round 7: Chain 2, hdc in same stitch, hdc in next 23 stitches, 2 hdc in next stitch, hdc in next 23 stitches, join with a sl st at the top of chain 2 (50)
Rounds 8-11: Chain 2, hdc all around, join (50) Fasten off.
***Now scroll down for the ribbing instructions to continue on from here (all hat sizes will use the same instructions for ribbing).
Final round: After finishing your ribbing you should end on the outer edge of the hat. If not, attach your yarn to the outer edge to make your final round. You will now make a border of sc around the outer edge of the house (50). Fasten off and weave in ends.
Toddler
Round 1: 8 Hdc in a magic circle, join. (8)
Round 2: Chain 2 (from this point forward count ch 2 as one stitch), hdc in same stitch, 2 hdc in next stitch and in each stitch around and join with a sl st at the top of ch 2 (16)
Round 3: Chain 2, hdc in same stitch, hdc in next stitch, * 2 hdc in next stitch, hdc in next stitch * repeat around and join with a sl st at the top of ch 2 (24)
Round 4: Chain 2, hdc in same stitch, hdc in next 2 stitches, * 2 hdc in next stitch, hdc in next 2 stitches * repeat around and join with a sl st at the top of ch 2. (32)
Round 5: Chain 2, hdc in same stitch, hdc in next 3 stitches, * 2 hdc in next stitch, hdc in next 3 stitches * repeat around and join with a sl st at the top of ch 2. (40)
Round 6: Chain 2, hdc in same stitch, hdc in next 4 stitches, * 2 hdc in next stitch, hdc in next 4 stitches * repeat around and join with a sl st at the top of chain 2 (48)
Round 7: Chain 2, hdc in same stitch, hdc in next 5 stitches, * 2 hdc in next stitch, hdc in next 5 stiches* repeat around and join with a sl st at the top of chain 2 (56)
Rounds 8-12: Chain 2, hdc all around, join (56) Fasten off.
***Now scroll down for the ribbing instructions to continue on from here (all hat sizes will use the same instructions for ribbing).
Final round: After finishing your ribbing you should end on the outer edge of the hat. If not, attach your yarn to the outer edge to make your final round. You will now make a border of sc around the outer edge of the house (56). Fasten off and weave in ends.
Child
Round 1: 8 Hdc in a magic circle, join. (8)
Round 2: Chain 2 (from this point forward count ch 2 as one stitch), hdc in same stitch, 2 hdc in next stitch and in each stitch around and join with a sl st at the top of ch 2 (16)
Round 3: Chain 2, hdc in same stitch, hdc in next stitch, * 2 hdc in next stitch, hdc in next stitch * repeat around and join with a sl st at the top of ch 2 (24)
Round 4: Chain 2, hdc in same stitch, hdc in next 2 stitches, * 2 hdc in next stitch, hdc in next 2 stitches * repeat around and join with a sl st at the top of ch 2. (32)
Round 5: Chain 2, hdc in same stitch, hdc in next 3 stitches, * 2 hdc in next stitch, hdc in next 3 stitches * repeat around and join with a sl st at the top of ch 2. (40)
Round 6: Chain 2, hdc in same stitch, hdc in next 4 stitches, * 2 hdc in next stitch, hdc in next 4 stitches * repeat around and join with a sl st at the top of chain 2 (48)
Round 7: Chain 2, hdc in same stitch, hdc in next 5 stitches, * 2 hdc in next stitch, hdc in next 5 stiches* repeat around and join with a sl st at the top of chain 2 (56)
Round 8: Chain 2, hdc in same stitch, hdc in next 6 stitches, * 2 hdc in next stitch, hdc in next 6 stitches* repeat around and join with a sl st at the top of chain 2 (64)
Rounds 9-15: Chain 2, hdc all around, join (64) Fasten off.
***Now scroll down for the ribbing instructions to continue on from here (all hat sizes will use the same instructions for ribbing).
Final round: After finishing your ribbing you should end on the outer edge of the hat. If not, attach your yarn to the outer edge to make your final round. You will now make a border of sc around the outer edge of the house (64). Fasten off and weave in ends.
Adult
Round 1: 8 Hdc in a magic circle, join. (8)
Round 2: Chain 2 (from this point forward count ch 2 as one stitch), hdc in same stitch, 2 hdc in next stitch and in each stitch around and join with a sl st at the top of ch 2 (16)
Round 3: Chain 2, hdc in same stitch, hdc in next stitch, * 2 hdc in next stitch, hdc in next stitch * repeat around and join with a sl st at the top of ch 2 (24)
Round 4: Chain 2, hdc in same stitch, hdc in next 2 stitches, * 2 hdc in next stitch, hdc in next 2 stitches * repeat around and join with a sl st at the top of ch 2. (32)
Round 5: Chain 2, hdc in same stitch, hdc in next 3 stitches, * 2 hdc in next stitch, hdc in next 3 stitches * repeat around and join with a sl st at the top of ch 2. (40)
Round 6: Chain 2, hdc in same stitch, hdc in next 4 stitches, * 2 hdc in next stitch, hdc in next 4 stitches * repeat around and join with a sl st at the top of chain 2 (48)
Round 7: Chain 2, hdc in same stitch, hdc in next 5 stitches, * 2 hdc in next stitch, hdc in next 5 stiches* repeat around and join with a sl st at the top of chain 2 (56)
Round 8: Chain 2, hdc in same stitch, hdc in next 6 stitches, * 2 hdc in next stitch, hdc in next 6 stitches* repeat around and join with a sl st at the top of chain 2 (64)
Round 9: Chain 2, hdc in same stitch, hdc in the next 15 stitches, * 2 hdc in the next stitch, hdc in the next 15 stitches* repeat around and join with a sl st at the top of chain 2 (68)
Rounds 10- 17: Chain 2, hdc all around (68) Fasten off.
***Now scroll down for the ribbing instructions to continue on from here (all hat sizes will use the same instructions for ribbing).
Final round: After finishing your ribbing you should end on the outer edge of the hat. If not, attach your yarn to the outer edge to make your final round. You will now make a border of sc around the outer edge of the house (68). Fasten off and weave in ends.
Ribbing Instructions:
To make the ribbing the instructions are the same for each hat size. After finishing this ribbing section of the hat, be sure to scroll back up to your hat size instructions to finish the final border/round around the hat.
For the start of the ribbing you will continue on from where you left off and Chain 5.
Row 1: sc in second chain from hook and all the way down back to the body of the hat (4sc). Attach to hat with sl st into the next stitch on the hat. Sl st into the next stitch. Ch 1. Turn.
Row 2: Skip over the slip stitches and back to the 4 sc from the original chain. Sc in the back loop only in each st across. Ch 1, turn. (4 sc)
Row 3: Sc in back loop only in each stitch across. Sl st into next 2 stitches in the last round of the hat. Ch 1, turn.
Row 4: Repeat the above rows until you have worked your way all around the hat. The amount of ribbing you do depends on the hat size so there is no specific number of ribbing stitches to keep track of.
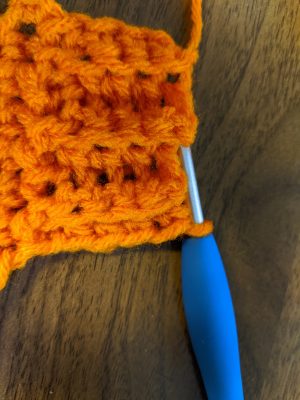
Your ribbing should begin to look like this as you progress:
Row 5: Once you have reached the end, sl st the last ribbing to the first ribbing, trying to find a place at the bottom of the hat to finish off so you can carry on with your final border. Go back to your hat’s original instructions to finish a border around your hat.
![]()
Now you have a great hat to keep you or your loved ones warm this fall and winter! Feel free to have fun with this one. Put a little color in the pom pom, add some snowflake embellishments, maybe even do some striping! Whatever you choose to do, I’m sure it will look great! And if you found this pattern through Ravelry, please feel free to share your finished products!
Happy crocheting!
All designs & pictures are copyrighted by To Craft A Home 2020. Pattern is for personal use only and can’t be resold, republished, or redistributed in any way. You may sell the finished project if you so desire, but please give credit and link to my website or my Etsy
Find more of my patterns on Ravelry
Thank you!!1