
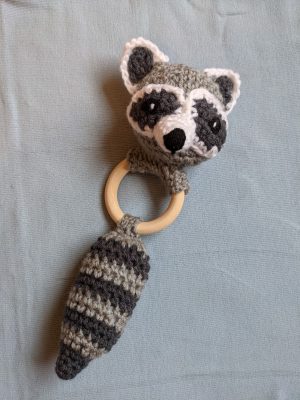
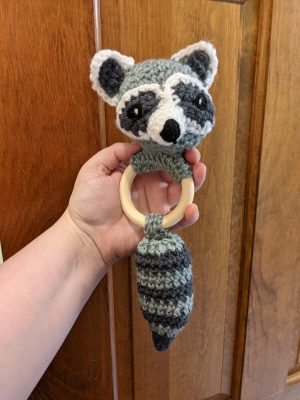
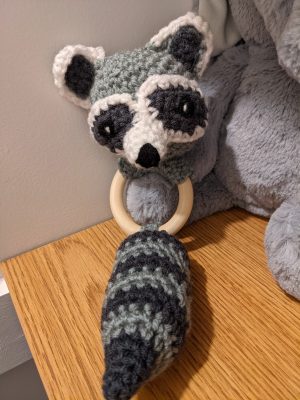
When it comes to infants and crochet, there’s such a variety of patterns and items that can be made for baby! As any seasoned crocheter knows, as baby showers near, handmade gifts are always some of the best one can give an expecting close relative or friend. Sometimes, however, there may not be time to make a baby blanket or perhaps you’re looking for more than a newborn hat. I find that a nice little toy fits the bill for my needs whenever I’m gifting, and being a mom that’s expecting myself, I’m continually thinking ahead for what the little hands in my future may like to one day like to hold! That’s why I came up with this little teether pattern. Great for little hands and completely handmade!
What’s even better? I based this little teething toy off of a raccoon, as forest themes are so popular right now in nurseries. Really, it’s a classic theme that never really goes away and it’s perfectly gender neutral for those who want to be surprised by the gender. I have so many friends using this theme for their nurseries right now and I just love it! What’s also great about this particular pattern, is that you can also interchange the pattern with a fox too! Giving a gift for a set of twins? A fox and raccoon teether set would be perfect! Just follow the instructions below and change out the colors depending on which you’d like to do!
Materials
-3.5mm crochet hook
-Polyfil stuffing
-Embroidery needle
-Worsted weight yarn in colors charcoal, black, white, and medium to light gray (racoon) and/or orange, white, and black (fox).
-2.75-3 inch round natural wooden rings (I bought these off of Amazon https://www.amazon.com/gp/product/B074797XWH )
Head
Start with gray (racoon) or orange (fox) yarn
6sc in a magic circle
Round 1: 2sc in each st around (12)
Round 2: *sc in 1st st, 2sc in next st* repeat around (18)
Round 3: *sc in 1st 2 sts, 2sc in next st* repeat around (24)
Round 4: *sc in 1 3 sts, 2sc in next st* repeat around (30)
Rounds 5-10: sc in each st around (30)
Round 11: *sc in 1st 3 sts, dec next 2 sts together* repeat around (24)
Round 12: *sc in 1st 2 sts, dec next 2 sts together* repeat around (18)
Round 13: *sc in 1st st, dec next 2 sts together* repeat around (12)
At this point begin to stuff the head piece.
Round 14: dec 2 sts together around (6)
Round 15: Continue to dec until piece closes. Fasten off leaving a long tail for sewing.
Snout
Use white yarn (for both fox and racoon)
5sc in a magic circle
Round 1: 2sc in each st around (10)
Rounds 2 and 3: sc in each st around (10)
Using a little bit of black yarn you will now embroider on a nose and mouth to complete the snout.
Eyes
Start with charcoal yarn (for fox start with white yarn)
ch 6
Row 1: 5 sc across; ch 1 and turn (5)
Row 2: 4 sc across, inc in last st; ch 1 and turn (6)
Row 3: 5 sc across, inc in last st; ch 1 and turn (7)
Row 4: 7 sc across (7) Change to white yarn (raccoon only, if you are making the fox, just continue on with the yarn you are using)
Do a white sc border around the eye patch. Fasten off and weave in the ends. Embroider black eyes with a white middle.
Ears (Make two)
Use gray (raccoon) or orange (fox) yarn
ch 5
Row 1: place a single into each ch space starting from the 2nd ch from hook; ch 1 and turn (4)
Row 2: sc in each space across; ch 1 and turn (4)
Row 3: dec 1st 2 sts together, sc in next 2 sts; ch 1 and turn (3)
Row 4: sc in each st across; ch 1 and turn (3)
Row 5: dec 1st 2 sts together, sc in next st; ch 1 and turn (2)
Row 6: dec both sts together; fasten off leaving a long tail for sewing (1)
Smaller Inner Ear (make two)
Use charcoal yarn (use white for fox)
ch 4
Row 1: In 2nd ch from hook place a sc and sc all the way back to the beginning; ch 1 and turn (3)
Row 2: dec 1st 2 sts together, sc in next st; ch 1 and turn (2)
Row 3: dec both sts together; fasten off leaving a long tail for sewing (1)
Sew the smaller inner ear to the larger ear piece. For the raccoon you will now place a sc border around the sides (minus the bottom) in white. For the fox you will just want to embroider a little bit of black yarn to the tip of the ear. Now attach the ears to the top of your head piece. Next attach your eyes to the head. After doing so, you will want to lightly stuff the snout and place that just below the eyes.
Ring Gripper
Use gray yarn for raccoon (use orange for fox)
ch 11
Row 1: in 2nd ch from hook place a sc and sc all the way back to beginning; ch 1 and turn (10)
Rows 2-6: sc across; ch 1 and turn (10)
You will now take your flat ring gripper piece and wrap it around the ring. Sew to the ring. After it is secured, sew the head directly to the top of the ring gripper.
Tail
Start with charcoal (for fox you will start with white and continue until round 9)
3sc in a magic circle
Round 1: inc in each st around (6)
Rounds 2 and 3: sc in each st around (6)
Round 4: inc in each st around (12)
Change to medium gray
Round 5: sc in each st around (12)
Round 6: *sc in 1st st, inc in the next st*; repeat around (18)
Change to charcoal
Rounds 7 and 8: sc in each st around (18)
Change to medium gray (Change to orange if making the fox)
Rounds 9 and 10: sc in each st around (18)
Change to charcoal
Rounds 11 and 12: sc in each st around (18)
Change to medium gray
Rounds 13 and 14: sc in each st around (18)
Change to charcoal
Rounds 15 and 16: sc in each st around (18)
Change to medium gray and begin to stuff the piece
Round 17: *sc in 1st st, dec next 2 sts together*; repeat around (12)
Rounds 18 and 19: dec around (6) Do not fasten off
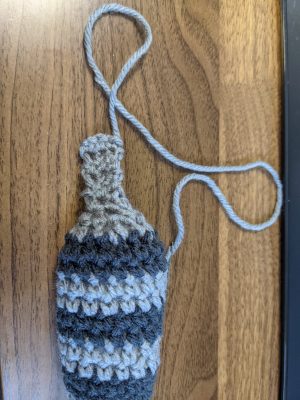
At this point you will squeeze the open end piece until the stitches meet and place 3 sc in each st across to close the piece. From here you will ch 1 and sc in each st for a total of 3 sc. Ch 1 and turn and sc across again (3) and repeat this until you have a long piece long enough to sew around the bottom of your wooden teether. Fasten off and leave a long tail for sewing. It will look as follows:
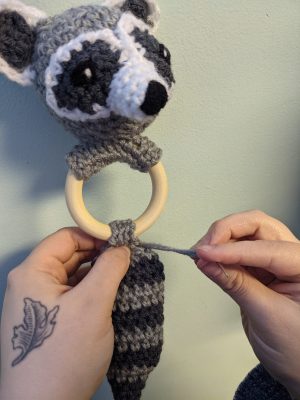
Next wrap the piece you just finished around the bottom of the teether directly below the head piece. Take your needle and sew it tightly in place. Fasten off and weave in the ends.
That’s it! Now your teether can be thoroughly enjoyed. Perfect for your next baby shower!
All designs & pictures are copyrighted by To Craft A Home 2021. Pattern is for personal use only and can’t be resold, republished, or redistributed in any way. You may sell the finished project if you so desire, but please give credit and link to my website or my Etsy
Find more of my patterns on Ravelry