One of my favorite things about working the farmers market each summer are the many people I get to interact with and meet. People of all ages pop into my booth, most with something to add to my day. Many times there are compliments over my work. Other times there is kind critique, much that I take in thoughtfully to improve designs, set up, etc. My favorites though are always the ones who come in and decide to ask for a custom request. I absolutely love custom requests. They always tell so much about a person! What their interests are, why they are gifting a certain item to another close friend… That one little inside joke you’re let in on. The gift that says more about their love language or that little plushie that acts as a special comfort tool. All custom requests are fun for me. I have yet to find one that hasn’t inspired me in one way or another.
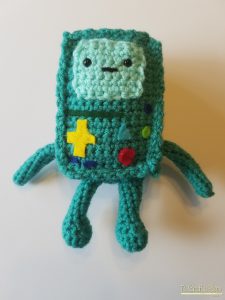
One day last summer a teenage boy nervously approached my booth asking me to make this Adventure Time BMO doll. He was so shy. His body language seemingly shouted, “Will she think I’m weird asking for this doll???” I didn’t. Everybody has their own interests and I knew some of mine were a lot crazier than that of an Adventure Time fan! Ha! The biggest thing understood though was how it felt to be a fan of something, and wanting something to deeply reflect on said interest.
Naturally I was enthusiastic to take on the challenge. I knew BMO wasn’t going to be the easiest to make and would require a lot of pieces, but I was determined to make it work. I really wanted to make a fan of the show happy, so I got to work. In less than a week a pattern was written out and BMO was finished. The teenage boy met me at my booth bright and early that weekend for his BMO doll and he was no longer nervous but elated with joy over my creation. His grin could be seen from miles away! He kept in touch with me after that and enthusiastically rattled off multiple other fan favorites I could create in the future. Anytime I can bring a nervous kid out of his shell is such an awesome feeling! The best part of crocheting is giving away the creation and seeing the happiness it brings.
And so here today I offer the totally free Adventure Time BMO pattern so that it can be passed on and shared with other fans of the show!
Materials
-
3.5mm crochet hook
-
Worsted weight (I used Red Heart Super Saver) yarn in colors jade, minty, and black
-
Felt in colors blue, yellow, red, black, and turquoise
-
Hot glue gun (if not sewing on felt pieces otherwise needle and thread)
-
6mm safety eyes
-
Embroidery needle
-
Polyfill stuffing
The body of this piece will be worked in 7 individual panels worked in rows that will be sewn together later.
Front and Back Panel (make two)
Use jade colored yarn.
Ch 13.
Row 1: sc in 2nd ch from hook until the beginning ch for a total of 12 sc. Ch 1 and turn.
Rows 2-18: sc in each st around; ch 1 and turn (12)
Fasten off weaving in all ends.
Side Panel (make two)
Use jade colored yarn.
Ch 7.
Row 1: sc in 2nd ch from hook until the beginning ch for a total of 6 sc. Ch 1 and turn.
Rows 2-18: sc in each st around; ch 1 and turn (6)
Fasten off and weave in the ends.
Top and Bottom Panel (make two)
Use jade colored yarn.
Ch 7.
Row 1: sc in 2nd ch from hook until the beginning ch for a total of 6 sc. Ch 1 and turn.
Rows 2-12: sc in each st around; ch 1 and turn (6)
Fasten off and weave in the ends.
Face Panel
Use minty colored yarn.
Ch 9.
Row 1: sc in 2nd ch from hook until the beginning ch for a total of 8 sc. Ch 1 and turn.
Rows 2-8: sc in each st around; ch 1 and turn (8)
Arms (make two)
Use jade colored yarn.
3 sc in a magic circle.
Round 1: inc in each st around (6)
Rounds 2-10: sc in each st around (6)
Fasten off leaving a long tail for sewing.
Legs (make two)
Use jade colored yarn.
6 sc in a magic circle.
Round 1: inc in each st around (12)
Round 2: sc in each st around (12)
Round 3: dec in first 6 sts (total of 3 dec altogether), sc in final 6 sts (9)
Round 4: dec in first 4 sts (total of 2 dec altogether), sc in final 5 sts (7)
Stuff foot with polyfill stuffing
Rounds 5-10: sc in each st around (7)
Fasten off leaving a long tail for sewing.
For the next few steps you may want to pull up a picture of BMO to work off of. I just googled a few images.
1. To start out you will need to cut out felt pieces to match the buttons on the front panel. If you choose to forgo the felt and embroider the buttons instead, do so now. It is entirely up to you!
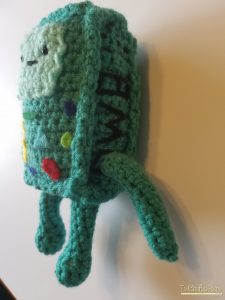
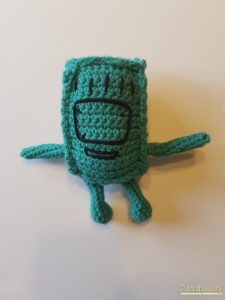
2. Next you will begin to embroider the details on the back and side panels. Be sure to remember to embroider “BMO” on the sides with an “O” big enough for the arm to fit in it!
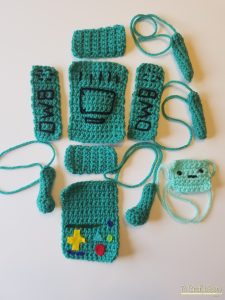
3. For the face piece embroider a tiny mouth and insert your safety eyes. Once all of this is completed you should have seven completed panels, 2 arms, and 2 legs waiting to be sewn together.
All of your panels and felt pieces should look like this before assembly:

You will next put together the body of BMO. Use your jade colored yarn to do this. You may choose to sew the panels on one by one or use a sl st to stitch them together (what I did). As your piece comes together do be sure you stuff the piece with polyfill stuffing. Be careful not to overfill so that the piece retains its box-like presentation.


And now he’s done! Pass him off to that one Adventure Time fan in your life or if you’re that fan, sit him right down next to you and enjoy the show together!
All designs & pictures are copyrighted by To Craft A Home 2018. Pattern is for personal use only and can’t be resold, republished, or redistributed in any way. You may sell the finished project if you so desire, but please give credit and link to my website www.tocraftahome.com or my etsy www.tocraftahome.etsy.com
Find more of my patterns on Ravelry: https://www.ravelry.com/people/ToCraftAHome
