As a fellow crocheter I’m sure any one of you reading this can certainly relate to the dreaded yarn overflow problem. If you’re anything like me, you collect yarn compulsively. Currently I have at least five bins of yarn in my basement. I use yarn out of each bin, but always there’s that one dedicated bin for novelty yarns that I admittedly do not use as much as I should. I fall in love with a color/color combo of yarn, find endless amounts of clearance yarn, or am gifted yarn by someone else with good intentions. I swear to myself I’ll eventually get to using those beautiful yarns, but always they end up in the novelty yarn bin. As I was going through my yarn the other day I came across many types of yarns I oooohed and ahhhhhed over, swearing yet again that I would pick them up and find purpose for them. This project was meant to be exactly that. A purpose for at least one skein of the forgotten novelty yarn.
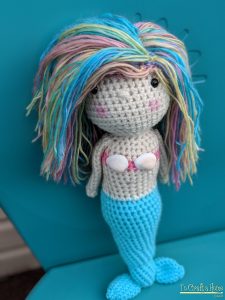
This beautiful rainbow yarn was meant to be mermaid hair. Am I wrong?
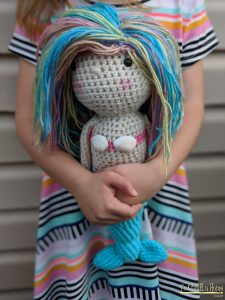
When I think of summer crochet toys, a mermaid almost always pops up! A good mermaid always includes bright colors to represent the best sorts of feelings of summer! I wanted to make up my own pattern for a mermaid this year, but I knew it would be tricky since there were so many great ones out there! I accepted the challenge however, and found the perfect colors for what I was envisioning in my head! I couldn’t be happier with her. Of course I just had to share this one!

Materials:
-
4.00mm crochet hook
-
Yarn (any worsted weight yarn will work for the body/head and any specialty yarn will work for the hair) I used: Red Heart Super Saver in colors aran and pink, I Love This Yarn Solids in color Turquoise, and Red Heart Unforgettable in color Candied.
-
2 9mm black safety eyes
-
2 small clam shells
-
Hot glue gun
-
Embroidery Needle
-
Polyfil Stuffing
-
Pink blush or eyeshadow (optional)
Head
Begin with aran colored yarn.
6 sc in a magic circle.
Round 1: 2sc in each st around (12)
Round 2: *sc in 1st st, inc* repeat around (18)
Round 3: *sc in 1st 2 sts, inc* repeat around (24)
Round 4: *sc in 1st 3 sts, inc* repeat around (30)
Round 5: *sc in 1st 4 sts, inc* repeat around (36)
Round 6: *sc in 1st 5 sts, inc* repeat around (42)
Rounds 7-15: sc in each st around (42)
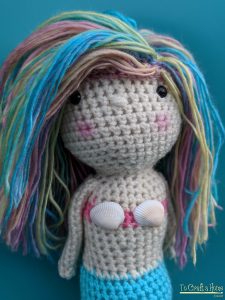
At this point insert your safety eyes between rows 11-12. Using the same color yarn embroider a small nose right below the eyes.
Round 16: *sc in 1st 6 sts, dec* repeat around (42)
Round 17: *sc in 1st 5 sts, dec* repeat around (36)
Round 18: *sc in 1st 4 sts, dec* repeat around (30)
Round 19: *sc in 1st 3 sts, dec* repeat around (24)
Round 20: *sc in 1st 2 sts, dec* repeat around (18)
Stuff head with polyfill stuffing here. Fasten off.
Tail/Body
Start with turquoise yarn. You will be working from the bottom of the tail to the top of the body.
6 sc in a magic circle.
Round 1: 2sc in each st around (12)
Rounds 2-9: sc in each st around (12)
Round 10: *sc in 1st st, inc* repeat around (18)
Rounds 11-16: sc in each st around (18)
Round 17: *sc in 1st 2 sts, inc* repeat around (24)
Rounds 18-21: sc in each st around (24)
Begin to stuff tail with polyfil stuffing, stuffing more gradually as you work your way through the tail and body.
Round 22: *sc in 1st 3 sts, inc* repeat around (30)
Rounds 23-29: sc in each st around (30)
Switch to aran colored yarn here.
Round 30: *sc in 1st 3 sts, dec* repeat around (24)
Rounds 31-33: sc in each st around (24)
Round 34: *sc in 1st 3 sts, inc* repeat around (30)
Rounds 35-37: sc in each st around (30)
Switch to pink yarn here
Rounds 38-39: sc in each st around (30)
Switch back to aran yarn
Rounds 40-41: sc in each st around (30)
Round 42: *sc in 1st 3 sts, dec* repeat around (24)
Round 43: *sc in 1st 2 sts, dec* repeat around (18)
Round 44: *sc in 1st st, dec* repeat around (12) Fasten off leaving a long tail for sewing. Finish stuffing with polyfil stuffing.
Fins (make two)
Use turquoise yarn
3 sc in a magic circle
Round 1: inc in each st around (6)
Round 2: sc in each st around (6)
Round 3: inc in each st around (12)
Rounds 4-8: sc in each st around (12)
Round 9: dec in each st around (6) Fasten off leaving a long thread for sewing.
Arms (make two)
Use aran yarn
4 sc in a magic circle
Round 1: inc in each st around (8)
Rounds 2-15: sc in each st around (8) Fasten off leaving a long tail for sewing. You may choose to lightly stuff the arm or leave it without stuffing.
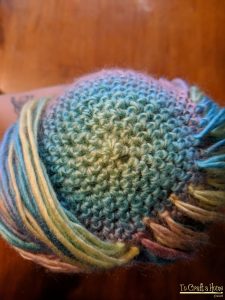
Hair cap
Use Candied colored yarn.
Depending on the thickness or type of yarn, you may need to increase or decrease the amount of rounds to complete this piece. It’s best to size compare it to your doll’s head while working on it. It should fit over your doll’s head as a tight fitting cap.
6 sc in a magic circle.
Round 1: 2sc in each st around (12)
Round 2: *sc in 1st st, inc* repeat around (18)
Round 3: *sc in 1st 2 sts, inc* repeat around (24)
Round 4: *sc in 1st 3 sts, inc* repeat around (30)
Round 5: *sc in 1st 4 sts, inc* repeat around (36)
Round 6: *sc in 1st 5 sts, inc* repeat around (42)
Round 7: *sc in 1st 6 sts, inc* repeat around (48)
Rounds 8-11: sc in each st around (48) Fasten off leaving a long tail for sewing.
Hair
Step 1: Sew the cap to the top of your doll’s head. Weave in the ends.
Step 2: Cut multiple strands of yarn measuring about 18 inches in length to use as your hair. It does not have to be exact, as the doll’s hair is meant to be wild in appearance.
**An easy method of cutting a bunch of yarn strands at once is by wrapping your yarn around a DVD case multiple times. Through this method you will only need to cut once!
Step 3: Attach each strand of hair onto the hair cap by latch hook method or tying. Use your crochet hook to guide your yarn through open spaces on the cap.
Continue to attach strands of hair until no more bare areas show. Position the hair as you see fit.

The final steps will be to attach the arms and fins to the doll. Next, hot glue the clam shells to the pink rows of the front of the mermaid. This will create the clam shell top. And to finalize the piece you may want to add a little bit of blush to the cheeks of your mermaid. I created the rosy cheeks by applying a small amount of pink eyeshadow to the areas.
Enjoy!

All designs & pictures are copyrighted by To Craft A Home 2018. Pattern is for personal use only and can’t be resold, republished, or redistributed in any way. You may sell the finished project if you so desire, but please give credit and link to my website www.tocraftahome.com or my etsy www.tocraftahome.etsy.com
Find more of my patterns on Ravelry: https://www.ravelry.com/people/ToCraftAHome
