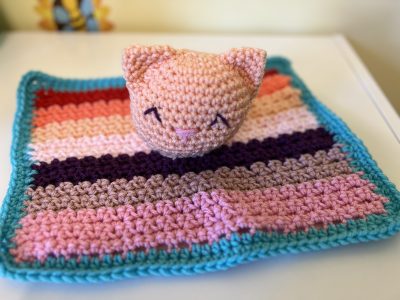
This past June, one of my best friends gave birth to a baby girl. Previously she had a son and one of her biggest complaints was not having enough kitty toys or clothing for boys. When she announced her second pregnancy, I just knew that I needed to make a gift that was cat themed so this little kitty lovey came to be! I made my version in more girlish rainbow colors, but you certainly can choose your own color scheme with this one! So if there happens to be anyone out there looking for kitty themed toys for boys, this pattern will work just as well for you too! Continue reading Baby Cat Lovey
Category: Free Crochet Patterns
Wednesday Addams Hat
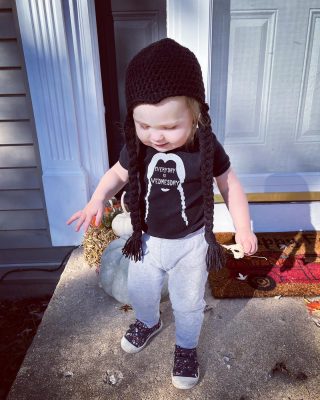
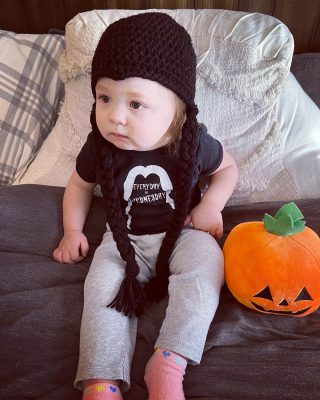
The other day I was thinking about how much I always love to make Halloweeny hats for all of my kids each year. The older kiddos aren’t as keen on this tradition these days and for the cooler days ahead they opted to have plainer, more neutral colored hats from mom. The youngest, however, is just starting to learn about how amazing and fun the chilly October days are! This kid loves to wear hats and has accepted any and all thrown her way. And so on the Wednesday before Halloween, what better hat came to mind than an actual Wednesday Addams hat! I came SO close to making that her costume, but at the last minute changed my mind. There’s always next year though, and we’ll be ready with this fun hat! For now, it matches perfectly one her Wednesday Addams onesie 🙂
Materials:
-
5.5mm crochet hook
-
Worsted weight yarn in black
-
Embroidery needle
0-3 Months
Round 1: 8 Hdc in a magic circle; join. (8)
Round 2: Ch 2, hdc in same st, 2 hdc in next st and in each st around; join with a sl st at top of ch 2. (16)
Round 3: Ch 2, hdc in same st, hdc in next st, *2 hdc in next st, hdc in next st*
repeat all around; join with a sl st at top of ch 2. (24)
Round 4: Ch 2, hdc in same st, hdc in next 2 sts, *2 hdc in next st, hdc in next 2 sts* repeat around; join with a sl st at top of ch 2. (32)
Round 5: Ch 2, hdc in same st, hdc in next 3 sts, *2 hdc in next st, hdc in next 3 sts* repeat around; join with a sl st at top of ch 2. (40)
Rounds 6-12: Ch 2, hdc in each st around; join with a sl st at top of ch 2. (40)
Round 13: Ch 1, sc in first 17 sts. Hdc in next 2 sts. In the next st place dc, tr, dc. Hdc in next 2 sts. Sc in the remaining 18 sts.
Fasten off.
Scroll down for braid instructions.
3-6 Months
Round 1: 8 Hdc in a magic circle; join. (8)
Round 2: Ch 2, hdc in same st, 2 hdc in next st and in each st around; join with a sl st at top of ch 2. (16)
Round 3: Ch 2, hdc in same st, hdc in next st, *2 hdc in next st, hdc in next st* repeat all around; join with a sl st at top of ch 2. (24)
Round 4: Ch 2, hdc in same st, hdc in next 2 sts, *2 hdc in next st, hdc in next 2 sts* repeat around; join with a sl st at top of ch 2. (32)
Round 5: Ch 2, hdc in same st, hdc in next 3 sts, *2 hdc in next st, hdc in next 3 sts* repeat around; join with a sl st at top of ch 2. (40)
Round 6: Ch 2, hdc in same st, hdc in next 13 sts, repeat twice more; join with a sl st at top of ch 2 (45)
Round 7-13: Ch 2, hdc in each st around; join with a sl st at top of ch 2. (45)
Round 14: Ch 1, sc in first 20 sts. Hdc in next 2 sts. In the next st place dc, tr, dc. Hdc in next 2 sts. Sc in the remaining 20 sts.
Fasten off.
Scroll down for braid instructions.
6-12 Months
Round 1: 8 Hdc in a magic circle; join. (8)
Round 2: Ch 2, hdc in same st, 2 hdc in next st and in each st around; join with a sl st at top of ch 2. (16)
Round 3: Ch 2, hdc in same st, hdc in next st, *2 hdc in next st, hdc in next st* repeat all around; join with a sl st at top of ch 2. (24)
Round 4: Ch 2, hdc in same st, hdc in next 2 sts, *2 hdc in next st, hdc in next 2 sts* repeat around; join with a sl st at top of ch 2. (32)
Round 5: Ch 2, hdc in same st, hdc in next 3 sts, *2 hdc in next st, hdc in next 3 sts* repeat around; join with a sl st at top of ch 2. (40)
Round 6: Ch 2, hdc in same st, hdc in next 4 sts, *2 hdc in next st, hdc in next 4 sts* repeat around; join with a sl st at top of ch 2. (48)
Round 7 Ch 2, hdc in same st, hdc in next 11 sts, repeat around; join with a sl st at top of ch 2 (52)
Rounds 8-14: Ch 2, hdc in each st around; join with a sl st in top of ch 2. (52)
Round 15: Ch 1, sc in first 23 sts. Hdc in next 2 sts. In the next st place dc, tr, dc. Hdc in next 2 sts. Sc in the remaining 24 sts.
Fasten off.
Scroll down for braid instructions.
Toddler
Round 1: 8 Hdc in a magic circle; join. (8)
Round 2: Ch 2, hdc in same st, 2 hdc in next st and in each st around; join with a sl st at top of ch 2. (16)
Round 3: Ch 2, hdc in same st, hdc in next st, *2 hdc in next st, hdc in next st* repeat all around; join with a sl st at top of ch 2. (24)
Round 4: Ch 2, hdc in same st, hdc in next 2 sts, *2 hdc in next st, hdc in next 2 sts* repeat around; join with a sl st at top of ch 2. (32)
Round 5: Ch 2, hdc in same st, hdc in next 3 sts, *2 hdc in next st, hdc in next 3 sts* repeat around; join with a sl st at top of ch 2. (40)
Round 6: Ch 2, hdc in same st, hdc in next 4 sts, *2 hdc in next st, hdc in next 4 sts* repeat around; join with a sl st at top of ch 2 (48)
Round 7: Ch 2, hdc in same st, hdc in next 5 sts, *2 hdc in next st, hdc in next 5 sts* repeat around; join with a sl st at top of ch 2. (56)
Round 8-16: Ch 2, hdc in each st around; join with a sli st in top of ch 2 (56)
Round 17: Ch 1, sc in first 25 sts. Hdc in next 2 sts. In the next st place dc, tr, dc. Hdc in next 2 sts. Sc in the remaining 26 sts.
Fasten off.
Scroll down for braid instructions.
Child
Round 1: 8 Hdc in a magic circle; join. (8)
Round 2: Ch 2, hdc in same st, 2 hdc in next st and in each st around; join with a sl st at top of ch 2. (16)
Round 3: Ch 2, hdc in same st, hdc in next st, *2 hdc in next st, hdc in next st* repeat all around; join with a sl st at top of ch 2. (24)
Round 4: Ch 2, hdc in same st, hdc in next 2 sts, *2 hdc in next st, hdc in next 2 sts* repeat around; join with a sl st at top of ch 2. (32)
Round 5: Ch 2, hdc in same st, hdc in next 3 sts, *2 hdc in next st, hdc in next 3 sts* repeat around; join with a sl st at top of ch 2. (40)
Round 6: Ch 2, hdc in same st, hdc in next 4 sts, *2 hdc in next st, hdc in next 4 sts* repeat around; join with a sl st at top of ch 2 (48)
Round 7: Ch 2, hdc in same st, hdc in next 5 sts, *2 hdc in next st, hdc in next 5 sts* repeat around; join with a sl st at top of ch 2. (56)
Round 8: Ch 2, hdc in same st, hdc in next 13 st, *2 hdc in next st, hdc in next 13 sts* repeat all around; join with a sl st at top of ch 2. (60)
Rounds 9-19: Ch 2, hdc in each st around; join with a sl st at top of ch 2. (60)
Round 20: Ch 1, sc in first 27 sts. Hdc in next 2 sts. In the next st place dc, tr, dc. Hdc in next 2 sts. Sc in the remaining 28 sts.
Fasten off.
Scroll down for braid instructions.
Teen/Adult
Round 1: 8 Hdc in a magic circle; join. (8)
Round 2: Ch 2, hdc in same st, 2 hdc in next st and in each st around; join with a sl st at top of ch 2. (16)
Round 3: Ch 2, hdc in same st, hdc in next st, *2 hdc in next st, hdc in next st* repeat all around; join with a sl st at top of ch 2. (24)
Round 4: Ch 2, hdc in same st, hdc in next 2 sts, *2 hdc in next st, hdc in next 2 sts* repeat around; join with a sl st at top of ch 2. (32)
Round 5: Ch 2, hdc in same st, hdc in next 3 sts, *2 hdc in next st, hdc in next 3 sts* repeat around; join with a sl st at top of ch 2. (40)
Round 6: Ch 2, hdc in same st, hdc in next 4 sts, *2 hdc in next st, hdc in next 4 sts* repeat around; join with a sl st at top of ch 2 (48)
Round 7: Ch 2, hdc in same st, hdc in next 5 sts, *2 hdc in next st, hdc in next 5 sts* repeat around; join with a sl st at top of ch 2. (56)
Round 8: Ch 2, hdc in same st, hdc in next 6 st, *2 hdc in next st, hdc in next 6 sts* repeat all around; join with a sl st at top of ch 2 (64)
Rounds 9-21: Ch 2, hdc in each st around; join with a sl st at the top of ch 2 (64)
Round 22: Ch 1, sc in first 29 sts. Hdc in next 2 sts. In the next st place dc, tr, dc. Hdc in next 2 sts. Sc in the remaining 30 sts.
Fasten off.
Braids
For each hat’s braids you will cut 18 strands of yarn around 40-48 inches in length (depends on how long you’d like the braid to be, I always add a bit extra and cut later to even it out). You can attach all 18 pieces to the sides of the hat. I try to fold over all of the strands together and use my crochet hook to attach them to the side of the hat. After this you will collectively have 36 strands to braid. Separate into even parts of 12 and braid together. Repeat for the opposite side.
Please visit To Craft A Home online:
https://www.etsy.com/shop/ToCraftAHome
https://www.facebook.com/ToCraftAHome
Crochet Acorns
It’s September and that means it’s the non-official official start of fall for me as well as many other fall lovers out there! Fall is my absolute favorite time of the year. I love everything from fall festivals to pumpkin spice to Halloween and pumpkin farms galore! The beautiful color changing leaves and cooler weather are also part of the amazing package deal that is this lovely season. I could spend hours in any craft store just smelling all the different fall scented candles and eyeing up newly added seasonal decor. As much as I say I won’t buy something, I always do because there are so many cute pieces that will add that perfect fall flare to my home…
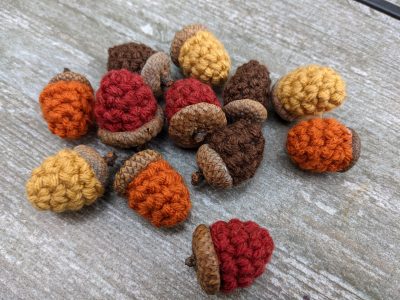
This year I decided to be a bit more creative and avoid too many outings, as I’m home most of the time with my brand new baby. Obviously since I’m a crocheter I wanted to make something out of yarn, but what? I found myself inspired by my husband’s love for oak trees and acorns. I recall many early Octobers when he would obsessively seek out the perfect oak tree for us to gather acorns from in hopes of growing our very own white oak tree. A few years ago we actually did grow quite a few seedlings and upon moving into our new home, planted the perfect oak tree in our yard which has done quite nicely with growing this past year! And so obviously with his love for oak trees I thought that making something out of actual real acorns would be fantastic and a great touch of fall in our home. These crocheted acorns are perfect for center pieces or accents and work up so fast you wouldn’t believe it!
Sunflower Baby Hat
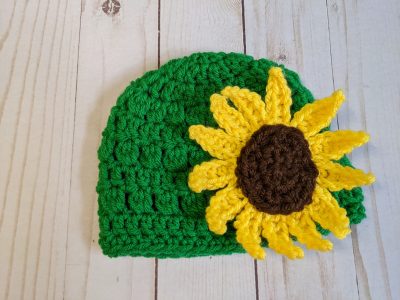
It’s August and that means it’s officially sunflower time! This hat in particular came to light when I found out I was having another little girl, and not just any little girl, but a little girl expected in August! Every August I associate seeing sunflowers everywhere, as well as visiting mammoth sunflower fields. They’re so sunshiney and happy. Who can resist them? Naturally I linked my little one to these beautiful flowers and wanted to make her first hat something special so the sunflower baby hat came to be! Continue reading Sunflower Baby Hat
Classic Granny Stitch Baby Blanket
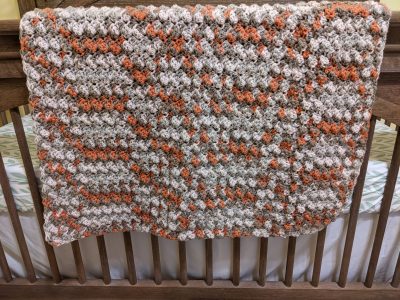
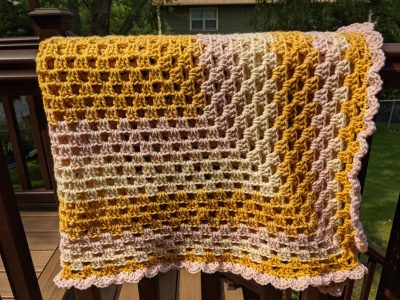
When it comes to blankets and afghans, I’m never a big fan. I lose interest quickly and prefer smaller projects that work up fast. However, I’ve found that self-striping yarn and just the right stitch or pattern can help push that boredom aside. The classic granny stitch is a great way to work something up and it’s been around forever. We’ve all grown up seeing this blanket. A taste of nostalgia mixed with endless comfort. Not only is this stitch as simple as can be, but also it looks very appealing to the eye! It’s truly one of those stitches where all you have to do is grab your project, hook, and skein, and park yourself down to watch a movie or settle in with friends for a nice cup of tea. This blanket practically works itself up!
With my oldest daughter, a blanket using this granny stitch was gifted to her at birth and we soon discovered it was her absolute favorite blanket as she grew. Cozy enough to keep her warm, but not too thick to overheat her. Just right! With our newest addition, I just knew I had to make up another one for her to also enjoy. I opted to make two different borders because there’s so much you can do to dress up this finished blanket! My best friend happens to be two weeks behind me in her own pregnancy, so of course I had to make her son a blanket as well. With this pattern I will include both borders, one being a more basic border, the other (as pictured above) with more of a shell stitch feminine border.
Bee and Sunflower Mobile
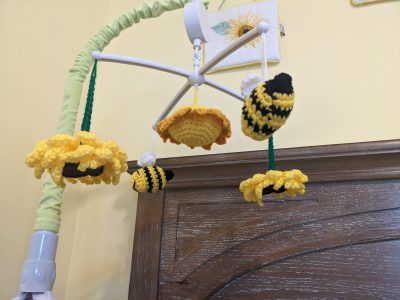
As the days dwindle down in my pregnancy I’m putting together the last pieces to our baby’s nursery. All must be in its rightful place, organized, and completely ready for baby. I’ve been reflecting back to the whole process of putting together this living space. So much work went into it and I’m very excited to start using it with our baby. Everything came together relatively fast once our theme was chosen and one could argue that was the most difficult part about assembling said nursery! My husband and I figured it out quite quickly when we discovered we were having another baby girl a couple months back. An August baby certainly called for sunflowers and bees. Then came the idea to make her a mobile inspired by the decor of her nursery. If anyone else is expecting a summer baby like me, or just loves everything to do with sunflowers and bees, this might be the pattern for you!
Bath Pouf
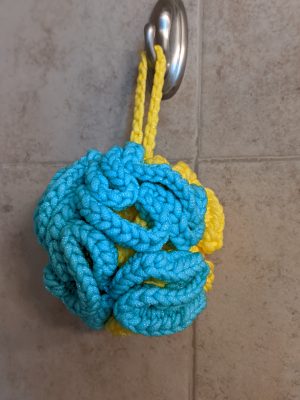
One of the things I love the most about crocheting is the fact that it goes beyond cute hats and doilies, but also can be a very useful skill for the home! From toy making for the kiddos to assorted clothing pieces, crochet is valuable in so many places! And I absolutely love making useful household items! Dish scrubbies are always a big hit, or even dish and wash cloths. So simple and always a necessity! One thing I have always struggled with, however, is finding the exact right way to make a bath pouf. In the past I’ve tried cotton and while it works up nicely and has a wonderfully soft texture, I have found that crocheted cotton bath poufs just don’t hold up well over time and very quickly absorb a mildew scent. I’ve been on the search for the perfect way to make bath poufs for awhile now and am happy to report that Hobby Lobby’s Scrub-Ology yarn fits the bill perfectly! It’s absorbent, great for scrubbing, and dries fast! No mildew smell leftover at all! What’s even better? These bath poufs work up super fast! So if you’re in the market for a nice bath pouf, give this one a try and let me know what you think!
The Pride Baby Hat
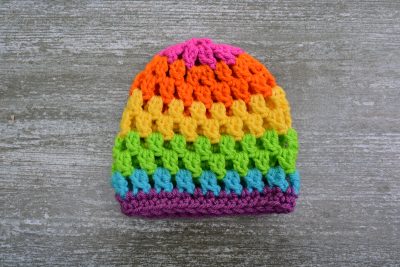
It’s June and that means Pride month is upon us! And what better way for an expectant mom to celebrate the occasion than to come up with a baby hat pattern in honor of this awesome month! Pride month is about celebrating so many things in the LGBTQ community and the colors of the pride flag should shine brightly! I wanted to make a hat designed for little ones, especially those part of these awesome families. It being one of the warmer months, I tried to design a nice lightweight crochet pattern for babies. The cluster stitch is great for this! This hat in particular works up really fast too, so if you want to make up something festive in a pinch, this is the hat for your little one!
Fox and Raccoon Baby Teether
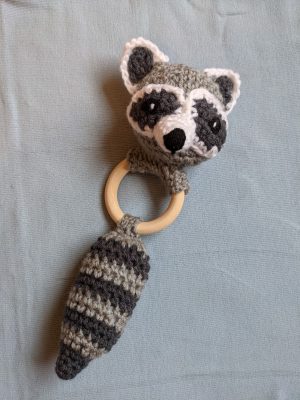
When it comes to infants and crochet, there’s such a variety of patterns and items that can be made for baby! As any seasoned crocheter knows, as baby showers near, handmade gifts are always some of the best one can give an expecting close relative or friend. Sometimes, however, there may not be time to make a baby blanket or perhaps you’re looking for more than a newborn hat. I find that a nice little toy fits the bill for my needs whenever I’m gifting, and being a mom that’s expecting myself, I’m continually thinking ahead for what the little hands in my future may like to one day like to hold! That’s why I came up with this little teether pattern. Great for little hands and completely handmade!
What’s even better? I based this little teething toy off of a raccoon, as forest themes are so popular right now in nurseries. Really, it’s a classic theme that never really goes away and it’s perfectly gender neutral for those who want to be surprised by the gender. I have so many friends using this theme for their nurseries right now and I just love it! What’s also great about this particular pattern, is that you can also interchange the pattern with a fox too! Giving a gift for a set of twins? A fox and raccoon teether set would be perfect! Just follow the instructions below and change out the colors depending on which you’d like to do!
The Easy Peasy Basic Baby Blanket
With a baby on the way and multiple friends also pregnant alongside me, as a crocheter, I’ve got a lot of work ahead of me! Baby blankets are always a common request and truthfully, one I love to give as gifts at showers. Surprisingly to some though, blankets aren’t my strong suit, and I find it very hard to stay motivated and focused on each one. When it comes to making a blanket, I find the simpler, the better.
I love this pattern because it’s only really two stitches that you need to remember. No change each row, no huge pattern to memorize or take with you, no color changes, etc. Just two simple stitches and a couple of skeins of yarn! This is the perfect blanket to make while watching your favorite show or movie, or just sitting to pass the time.
